1. Familiarising yourself with the Culture Counts platform
Once your organisation has completed the Impact & Insight Toolkit registration process, Counting What Counts will provide you with your login information so that you can start using the Culture Counts platform.
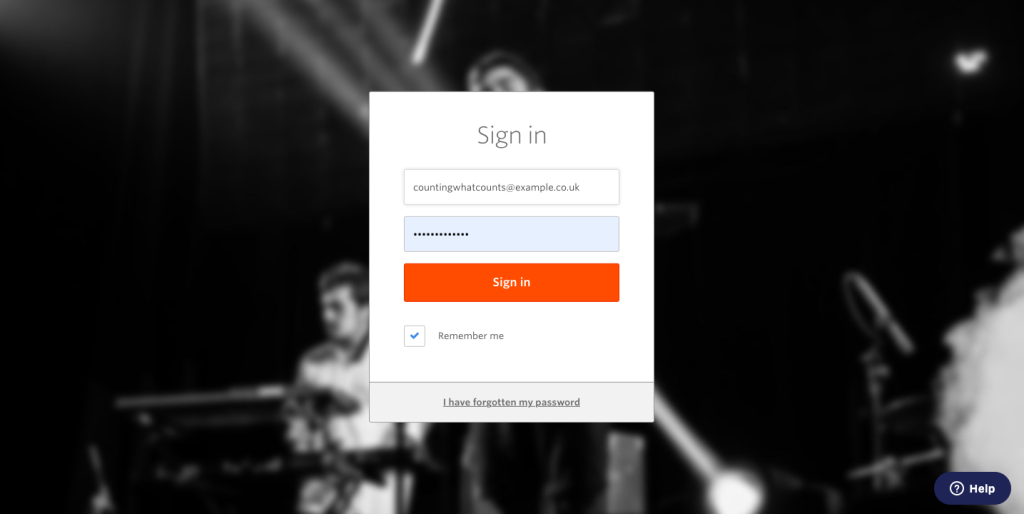
1.1 Logging into the Culture Counts platform
Click the ‘Log In’ button on the Impact & Insight Toolkit website to access the Culture Counts platform, enter your account email address and password, then click ‘Sign in’. You can also tick ‘Remember me’ to log you in automatically each time you visit the site.
1.2 Culture Counts dashboard
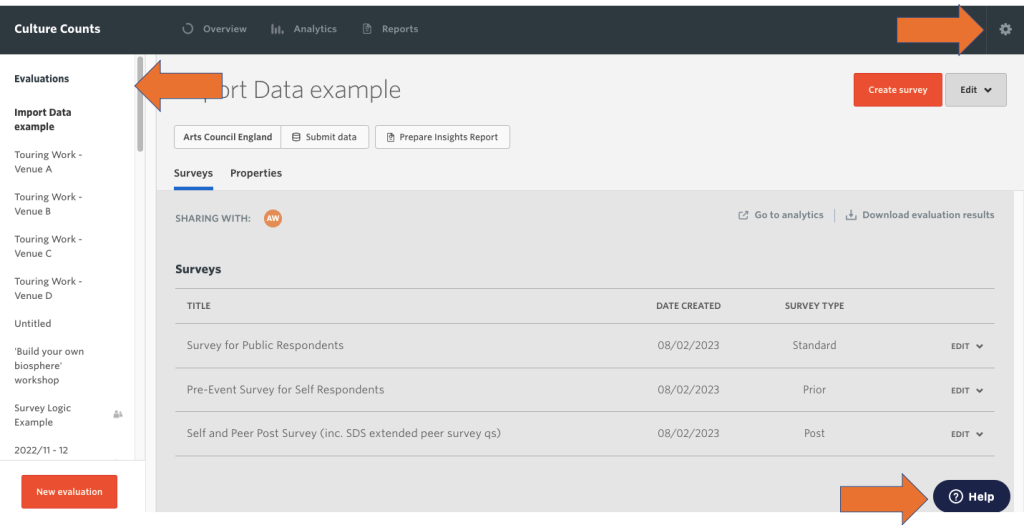
Once you’ve logged in, you’ll be taken to the Culture Counts dashboard. The menu bar on the left-hand side lists any evaluations your organisation has created; click on them to open an evaluation.
In the top right corner is a cog icon. Click on the cog icon to change your account settings or logout of the platform.
In the bottom right corner is a ‘Help’ button; use it to contact the Counting What Counts team for support.
2. Organisation management
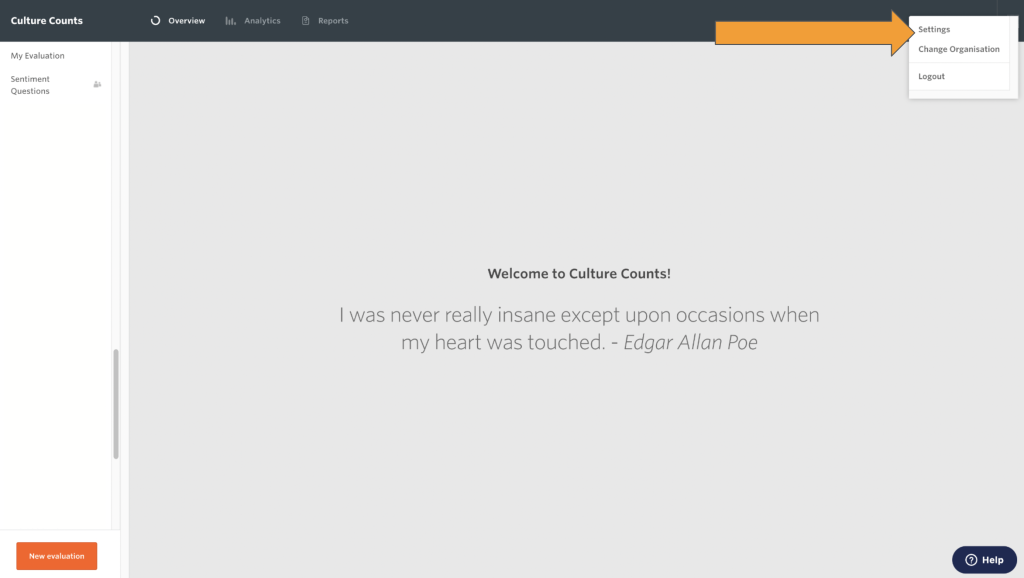
As a user of the Culture Counts platform your account will be linked to an organisation, most likely the organisation that you work for. You can view or change the settings for the organisation by clicking on the ‘Settings’ button from the dashboard.
2.1 User management
The User Management page enables you to invite, update and revoke user accounts within your organisation.
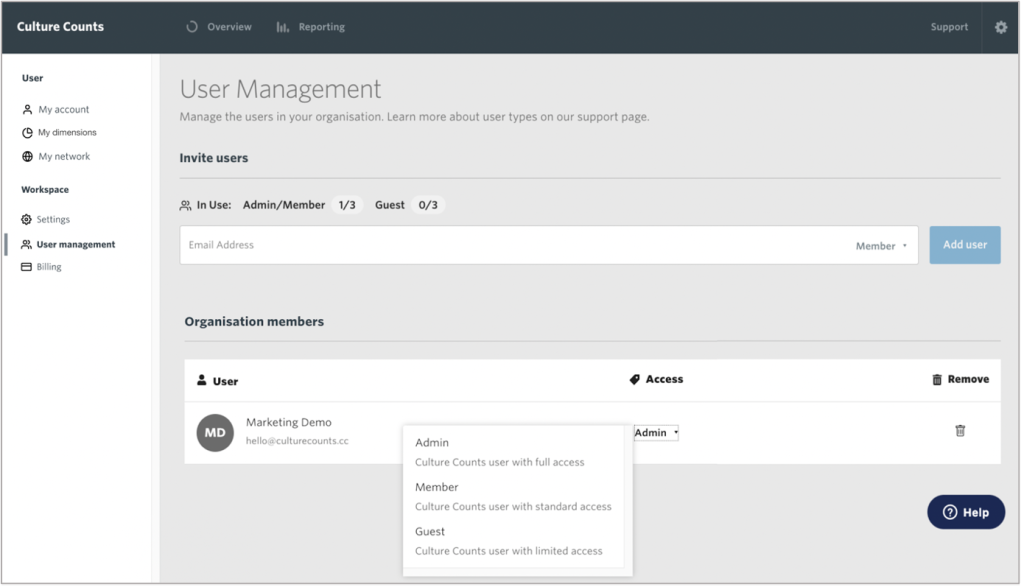
There are three user account types with different security and management options:
| User Account Type |
Admin |
Member |
Guest |
| View evaluations (individually or assigned) |
✅ |
✅ |
✅ |
| View evaluations (organisation assigned) |
✅ |
✅ |
✅ |
| View reports in dashboard |
✅ |
✅ |
✅ |
| Create evaluations |
✅ |
✅ |
❌ |
| Share evaluations |
✅ |
✅ |
❌ |
| Edit reports in dashboard |
✅ |
✅ |
❌ |
| Edit evaluation share permissions |
✅ |
✅ |
❌ |
| Create surveys |
✅ |
✅ |
❌ |
| Edit surveys |
✅ |
✅ |
❌ |
| Change user account permissions |
✅ |
❌ |
❌ |
| Add new user accounts |
✅ |
❌ |
❌ |
To edit Insights Reports a user needs to either be the creator of the evaluation, or to be added to that specific evaluation via the sharing tab.
The lead user for your organisation should be the Admin. Generally, most other people who work for the same organisation and who require access to the Culture Counts platform should be Members. Guest roles are good for external people who you might want to give access to your reports and evaluations without needing to create and run evaluations themselves.
Once an invitation to join the organisation has been sent to an individual, they have 24 hours to accept. If they do not accept in this time, the invitation will need to be resent. It is also worth knowing that sometimes invitations to join an organisation land in someone’s Junk/Clutter/Spam folders. Please do check these if the invitation does not appear in the Inbox.
2.2 My dimensions
This page allows you to create and manage dimension lists. A dimension list is a group of dimensions which you create once and then can be easily inserted into any new evaluations you create.
To navigate to this page, click the ‘My dimensions’ button on the left-hand side of the Settings page. From here you can see any dimension lists you have already created or create a new list.
The controls allow you to edit, duplicate or archive a dimension list. An archived list will not show up as an option when you are creating a new evaluation, but it will still be visible in this area of the dashboard. If you archive a list you can easily turn it back into an active list by clicking the ‘Restore’ button.
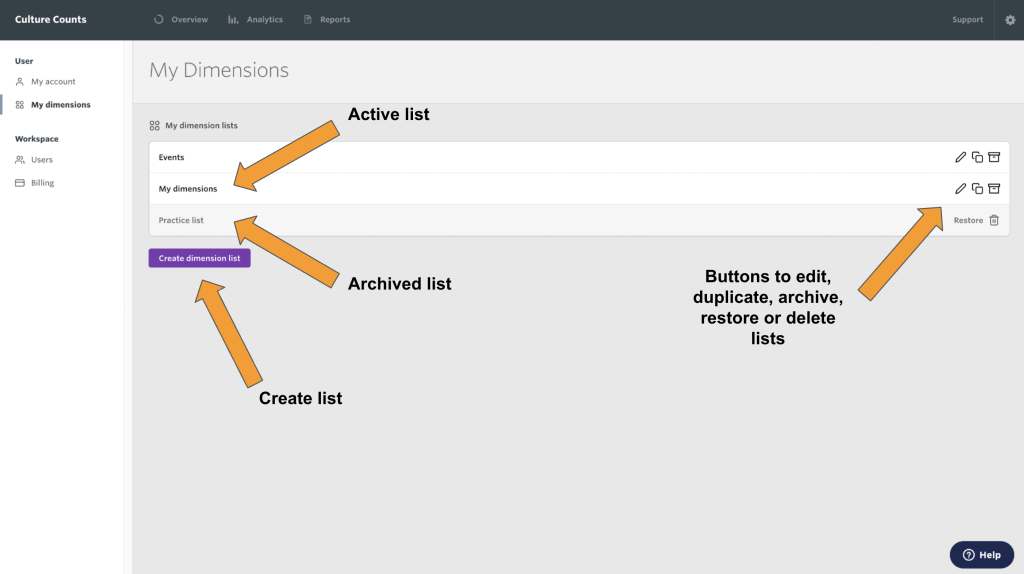
Clicking the ‘Create dimension list’ button will take you to the dimension selector. This is a tool which is used to create new dimension lists.
2.3 Using the dimensions selector
Once you click on the ‘Create dimension list’ button you will be taken to the dimension selector and dimension library. The dimension selector groups the dimensions together using the Dimensions Framework, making it easier to find the dimensions you are looking for. See our Dimensions Framework guidance for more information.
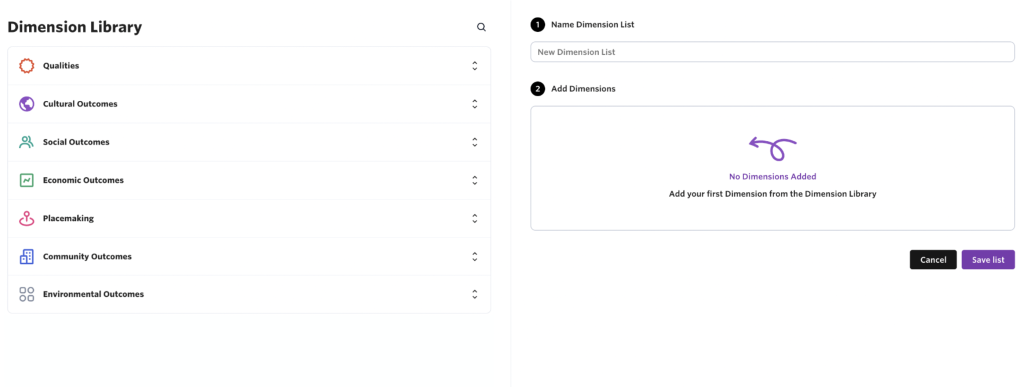
On the left-hand side is the list of expandable domains. Clicking on a domain will open it up, giving you a description of the domain and a list of dimension categories.
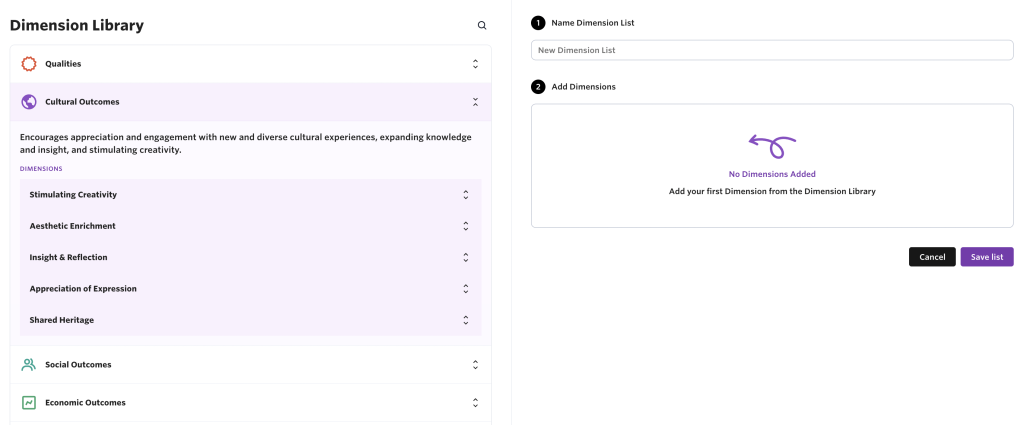
The dimension categories are also expandable, and clicking on a category will similarly show you a description of the category and a list of dimensions inside.
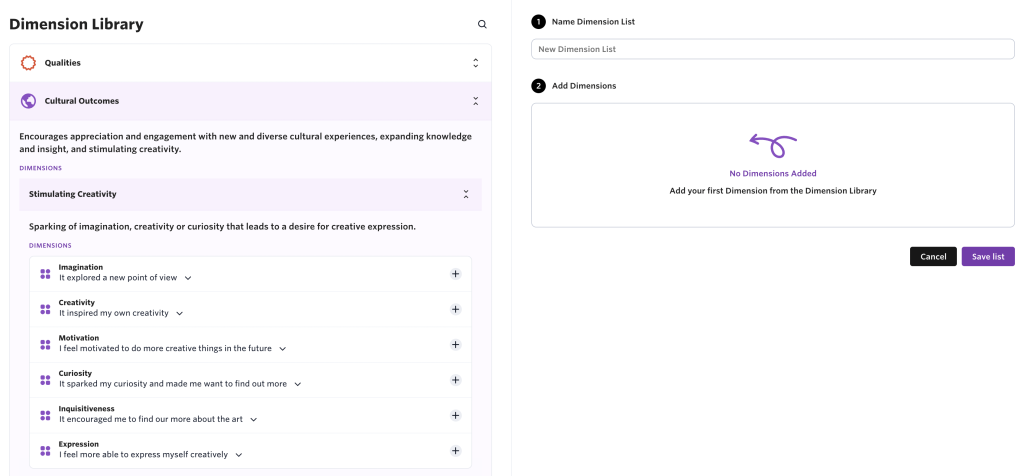
To add a dimension to the list, click on the ‘+’ sign to the right of the dimension. Once a dimension has been added it will appear on the right-hand side of the page, and the ‘+’ will turn into a tick. You can add up to 20 dimensions in a list.
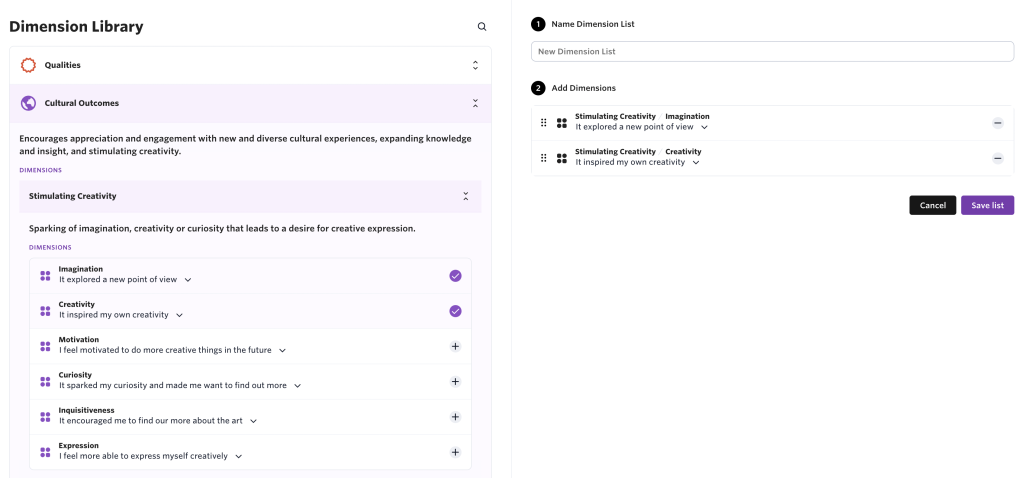

Clicking on the statement for a dimension will show the different variants for that statement.
Once you have chosen all the dimensions for the list, give the list a name and click the ‘Save list’ button.
You can create as many dimension lists as you like. See our Evaluation Guide for information on how to use them effectively.
3. Create evaluations
An evaluation is like a folder that contains surveys for a specific event, project or work that you want to measure the impact of. An evaluation will generally contain multiple surveys, all with different purposes.
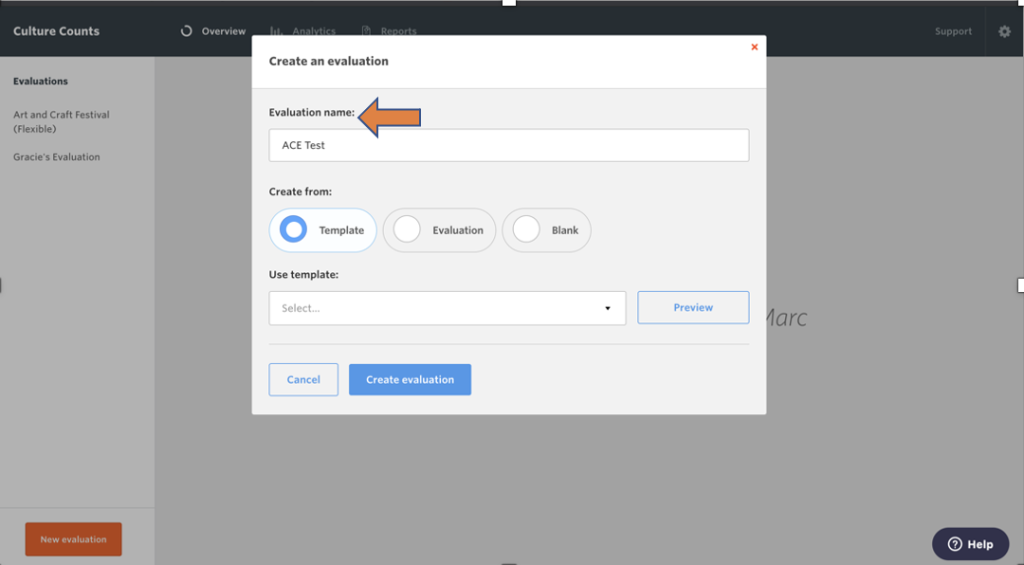
To create a new evaluation, on the Culture Counts dashboard click the orange ‘New Evaluation’ button.
A ‘Create an evaluation’ window will appear, enter the name of your evaluation in the ‘Evaluation name’ field.
An evaluation is generally named after a specific event, project or work that you want to measure the impact of.
3.1 From Template
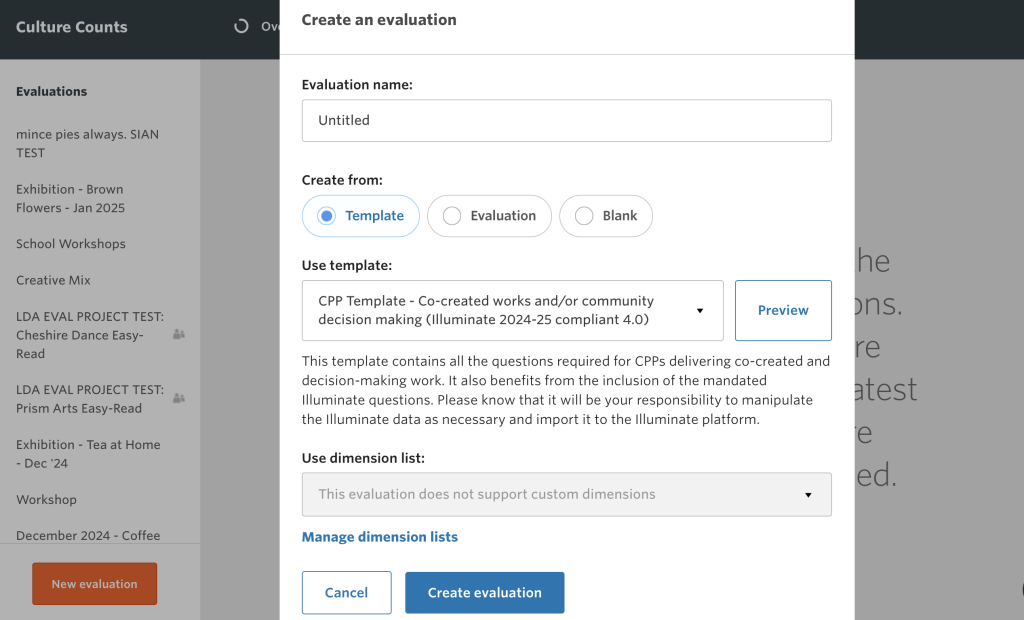
If you are new to the Toolkit, we recommend using the ‘Template’ option. It is the quickest way to set up an evaluation.
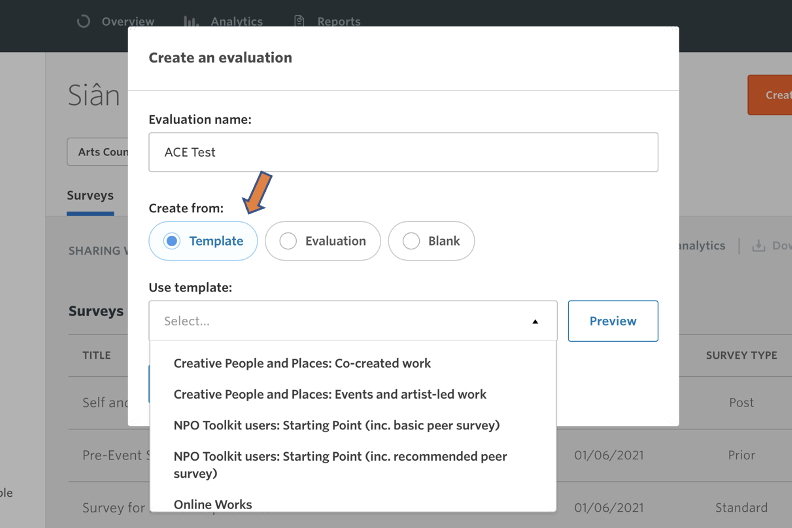
(Please know that the exact templates you have access to may vary from what’s shown in the screenshot above. This is due to our wish to constantly improve our template offerings and also to ensure that the templates visible to each organisation are suitable for their funding status with Arts Council England.)
- Click on ‘Template’ and select the template for your organisation or work type.
- Click the ‘Preview’ button (optional).
- Click the dropdown menu under the ‘Use dimension list’ section and select a dimension list. Dimension lists are created in the Articulating Ambitions stage and added to the platform using the Dimension Selector. Dependent on the template selected, there may not be the opportunity to add your own dimension list at this stage. You may still add dimensions later in the design process if you choose.
- Click the ‘Create Evaluation’ button.
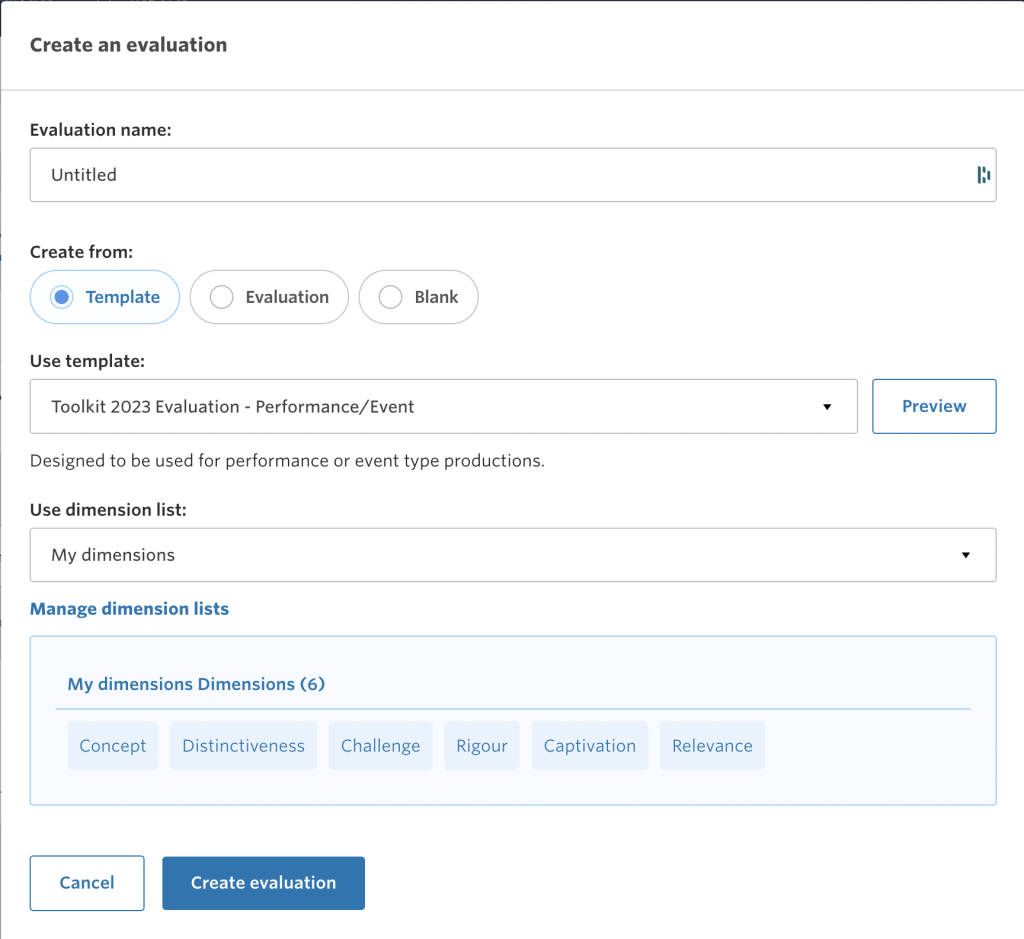
For more information about the different templates available, please look at the specific Evaluation Templates guidance.
3.2 As a copy
The ‘Evaluation’ option allows you to copy an existing evaluation. This is useful if you have a previous evaluation set up with specific custom questions or configurations that you would like to reuse.
- Click on ‘Evaluation’.
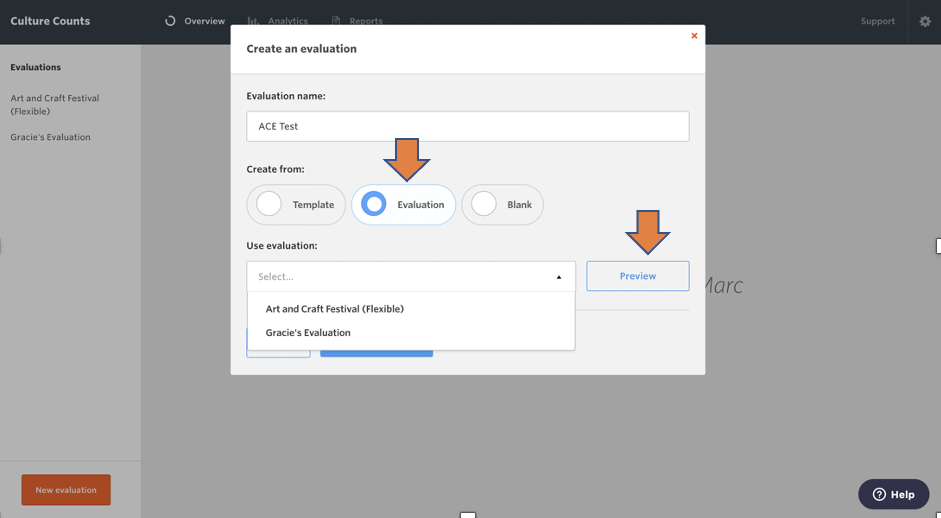
- Select a previously created evaluation from the dropdown menu.
- Click the ‘Preview’ button (optional).
- Click the ‘Create Evaluation’ button.
The evaluation will be created and populated with the same surveys and questions as the evaluation you chose to duplicate.
3.3 Blank
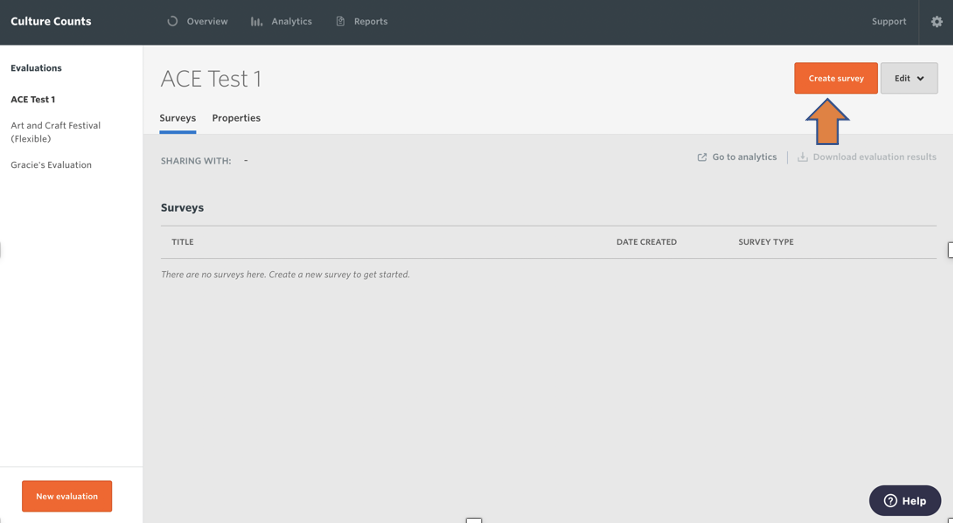
This option lets you create your own evaluation from scratch.
- Click on ‘Blank’.
- Click the ‘Create Evaluation’ button.
- An empty evaluation will be created.
- Use the ‘Create Survey’ button to create your surveys from scratch.
4. Share evaluations
There are two different methods you can use to share evaluations with other people. These are:
- Sharing with your organisation
- Sharing with individual users (either inside or outside your organisation)
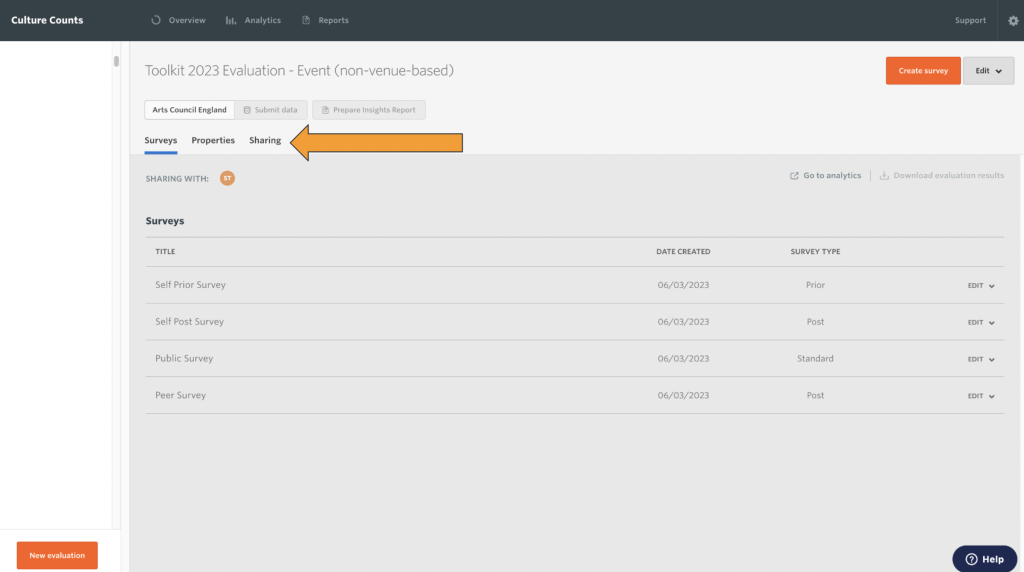
To access the sharing options for an evaluation, click on the ‘Sharing’ button on the Culture Counts dashboard for the chosen evaluation.
4.1 Sharing with your organisation
Evaluations can be shared with all Culture Counts accounts associated with your organisation with the click of a button. Doing this means that if new people join your organisation, you won’t need to go back and re-share old evaluations if you want them to have access.
To share an evaluation with your whole organisation, you will need to have ‘Full access’ for the evaluation. You will automatically have full access for all evaluations you create.
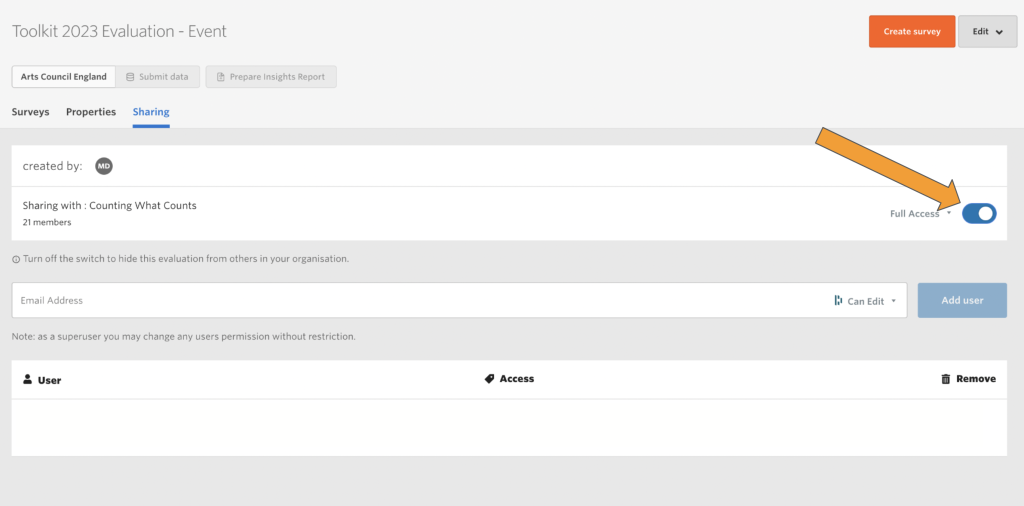
You can choose what level of access you give to your organisation:
- Full access: Can edit and share evaluations with others. Can access protected fields such as email and postcode responses.
- Can edit: Can edit surveys but not share evaluations with others. Cannot access protected fields.
- Can view: Can view but cannot edit or share evaluations with others. Cannot access protected fields.
4.2 Sharing with specific people
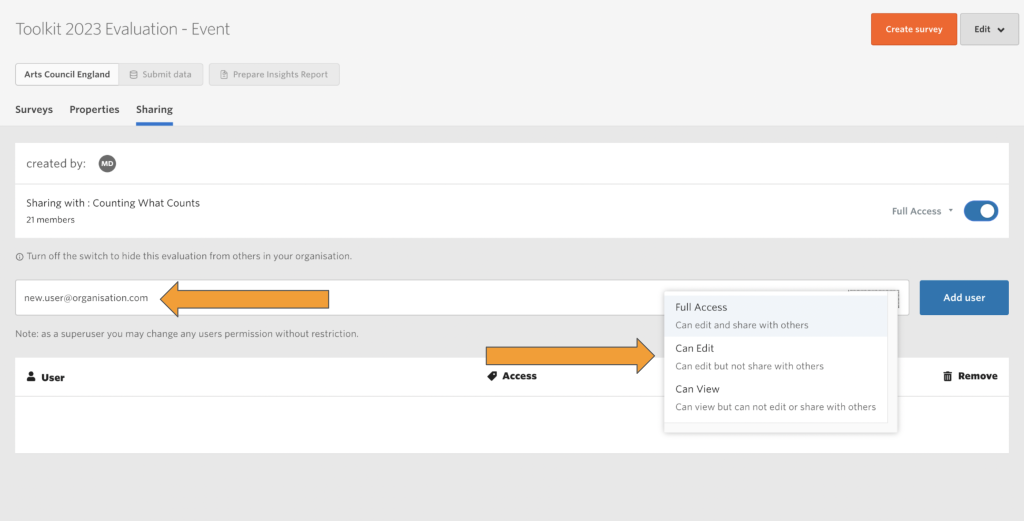
If you would like to share with an individual in your organisation, or to work collaboratively on an evaluation with people outside your organisation, you can do so by sharing the evaluation with them using their email address.
You enter the email address of the person you would like to share the evaluation within the box provided. You can then choose the level of access you would like to provide. As with sharing with your organisation, the options are:
- Full access: Can edit and share evaluations with others. Can access protected fields such as email and postcode responses.
- Can edit: Can edit surveys but not share evaluations with others. Cannot access protected fields.
- Can view: Can view but cannot edit or share evaluations with others. Cannot access protected fields.
This will only work if the email address you enter belongs to another Culture Counts account.
4.3 Leaving an evaluation
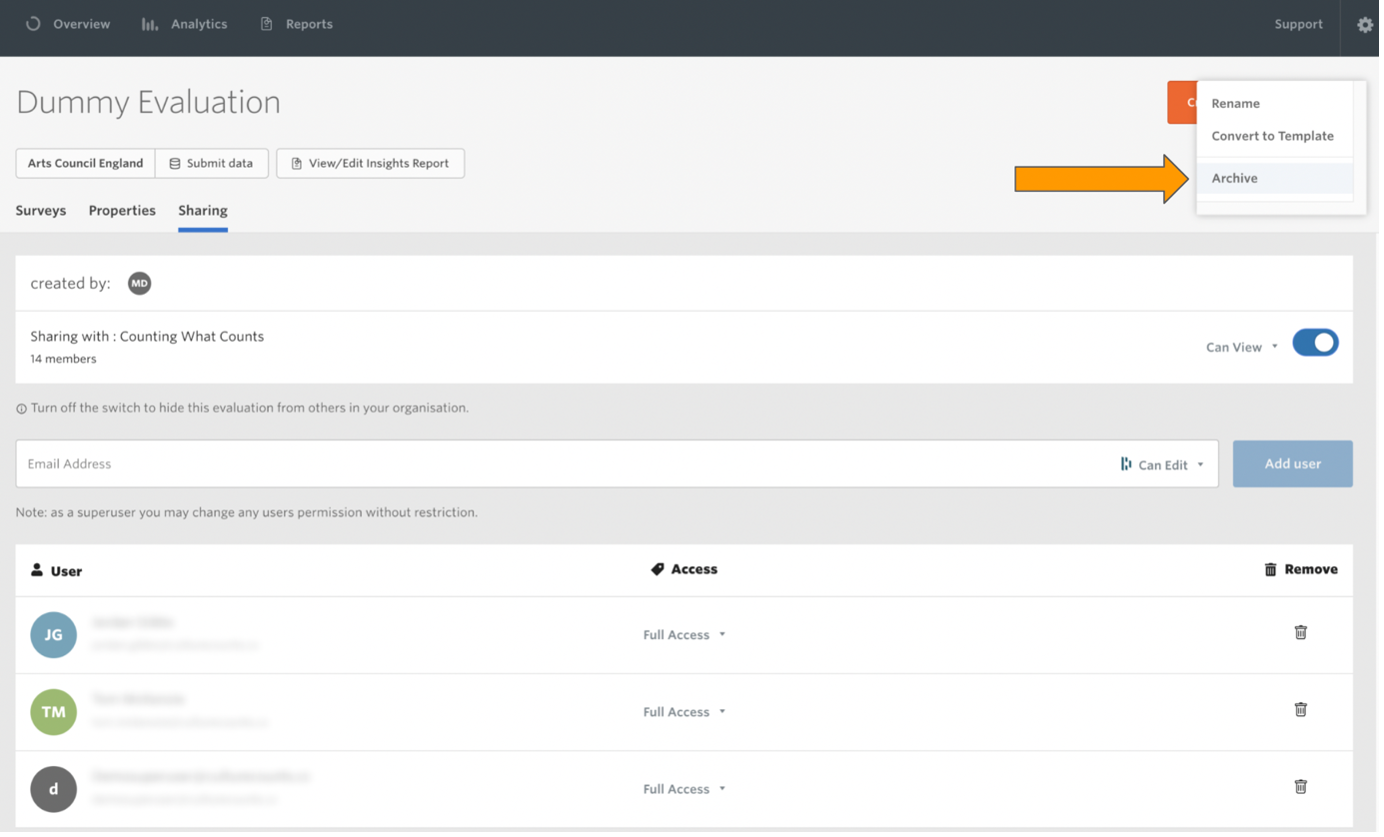
If an evaluation is shared with you but you do not wish for it to be in your dashboard, you can remove the share by first opening the ‘Edit’ menu and selecting ‘Archive’. This opens a menu which allows you to remove the share.
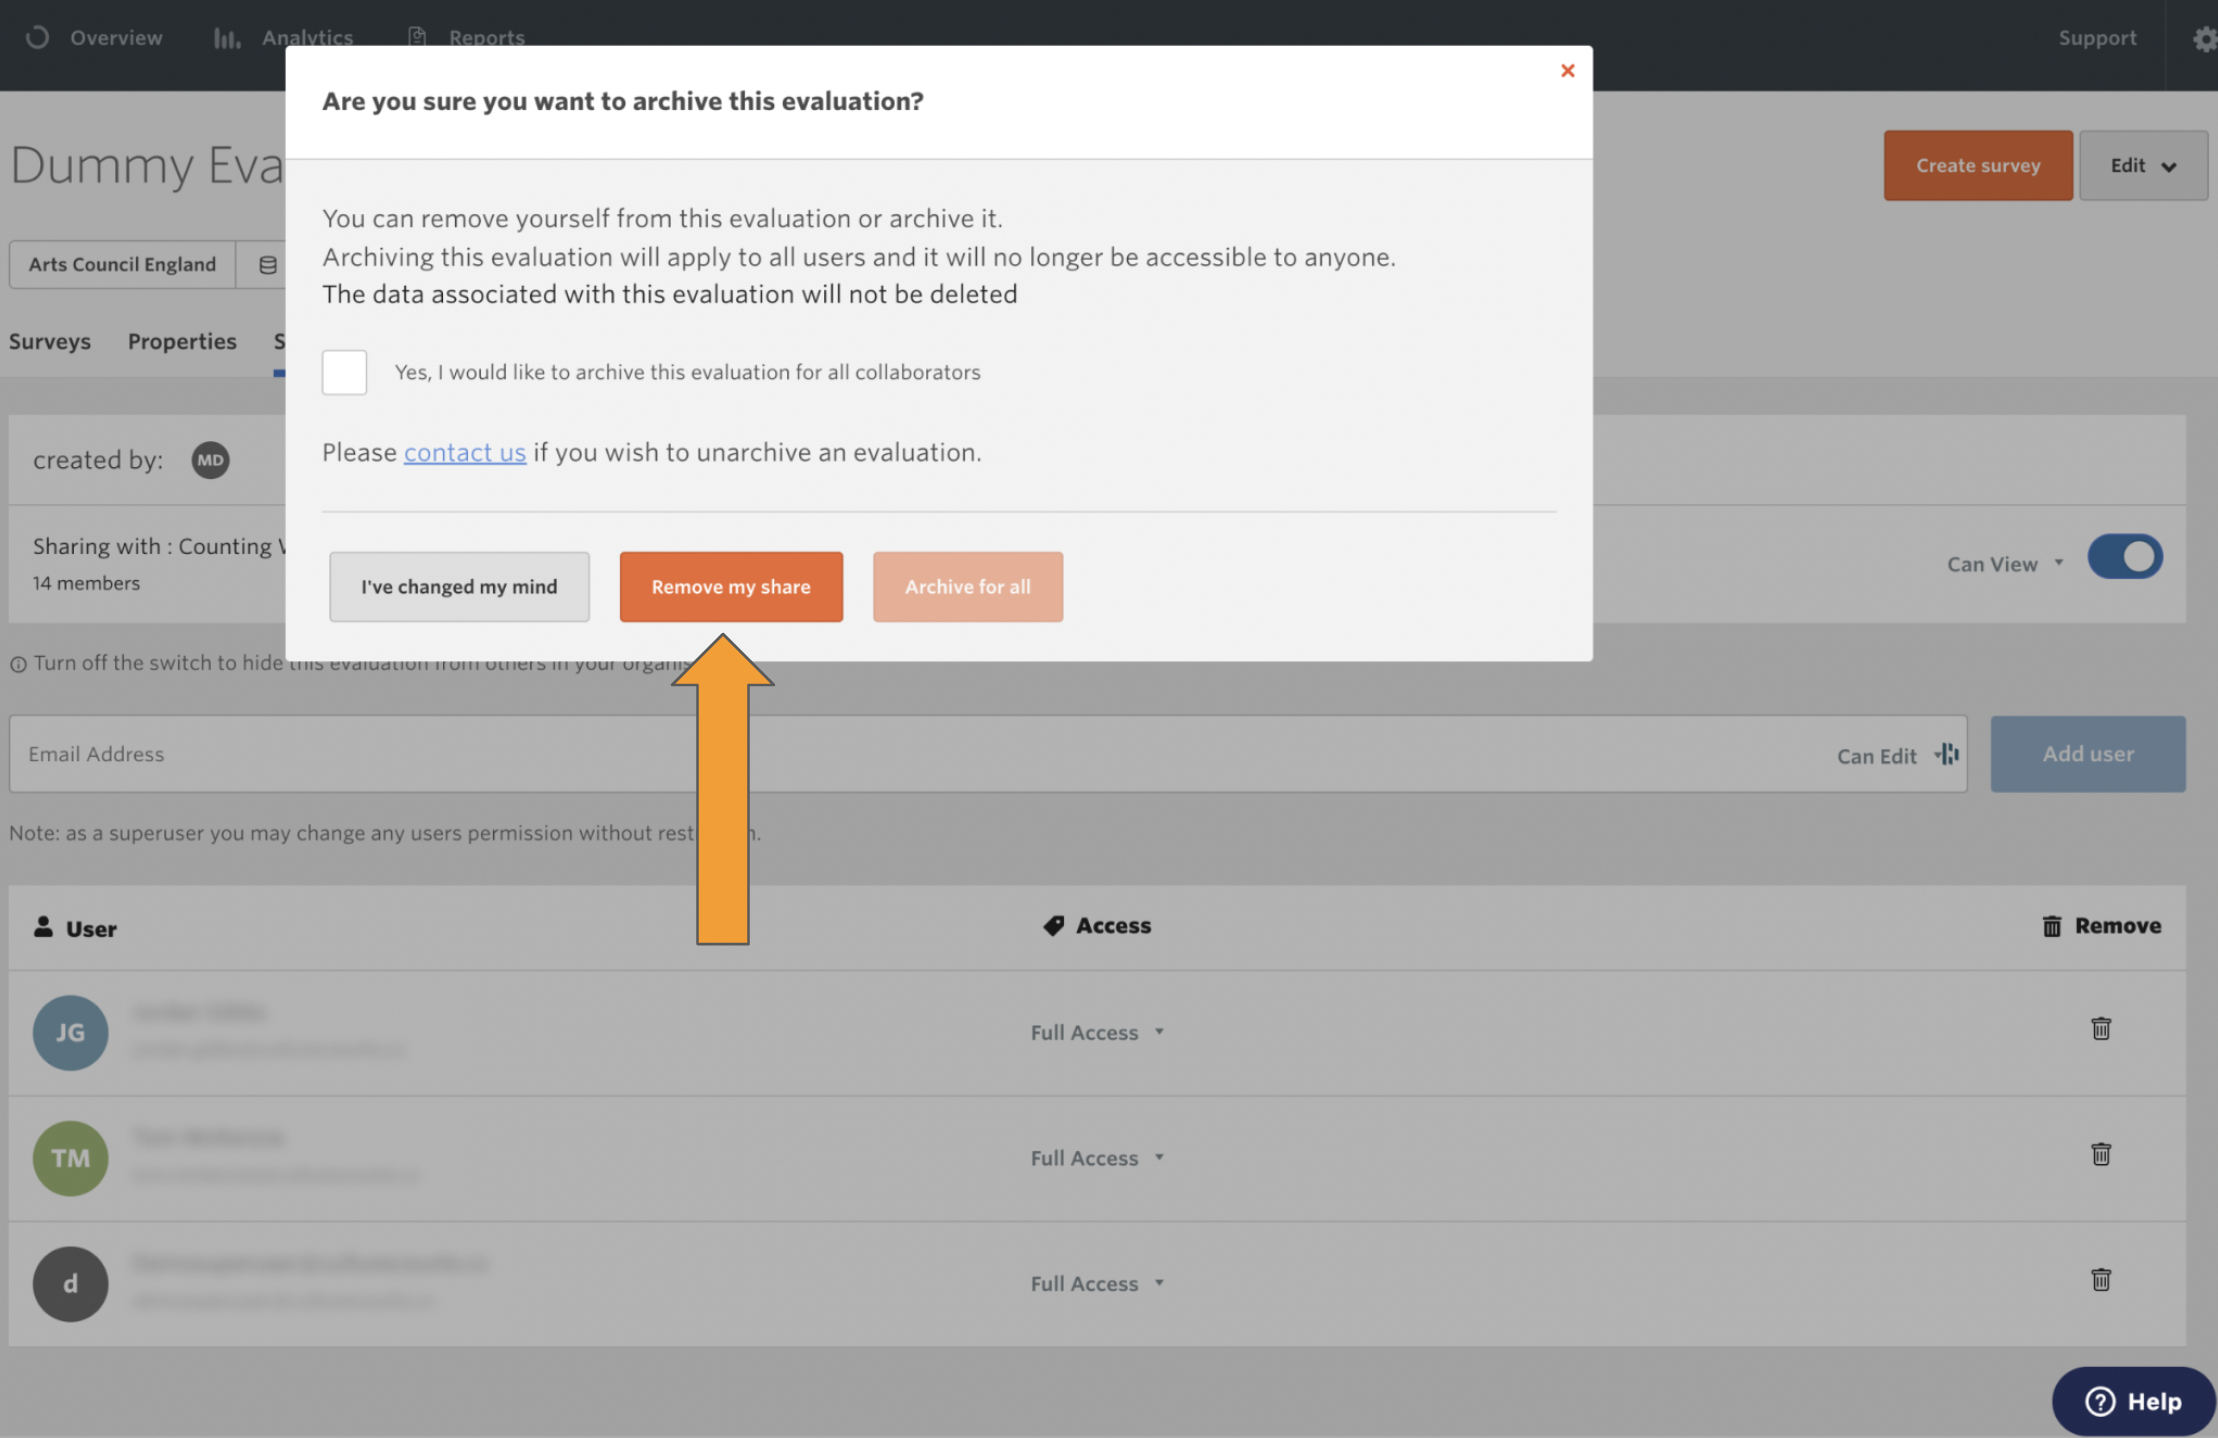
Alternatively, you can ask the person who owns the evaluation to remove you from the list of shared users.
5. Design surveys
Designing a survey is the process of customising and adding content to a survey in an evaluation, depending on the information you would like to communicate to, and find out from, your respondents.
5.1 Configure your survey
Click on a survey in your evaluation and then click on the ‘Configure’ tab in the navigation panel.
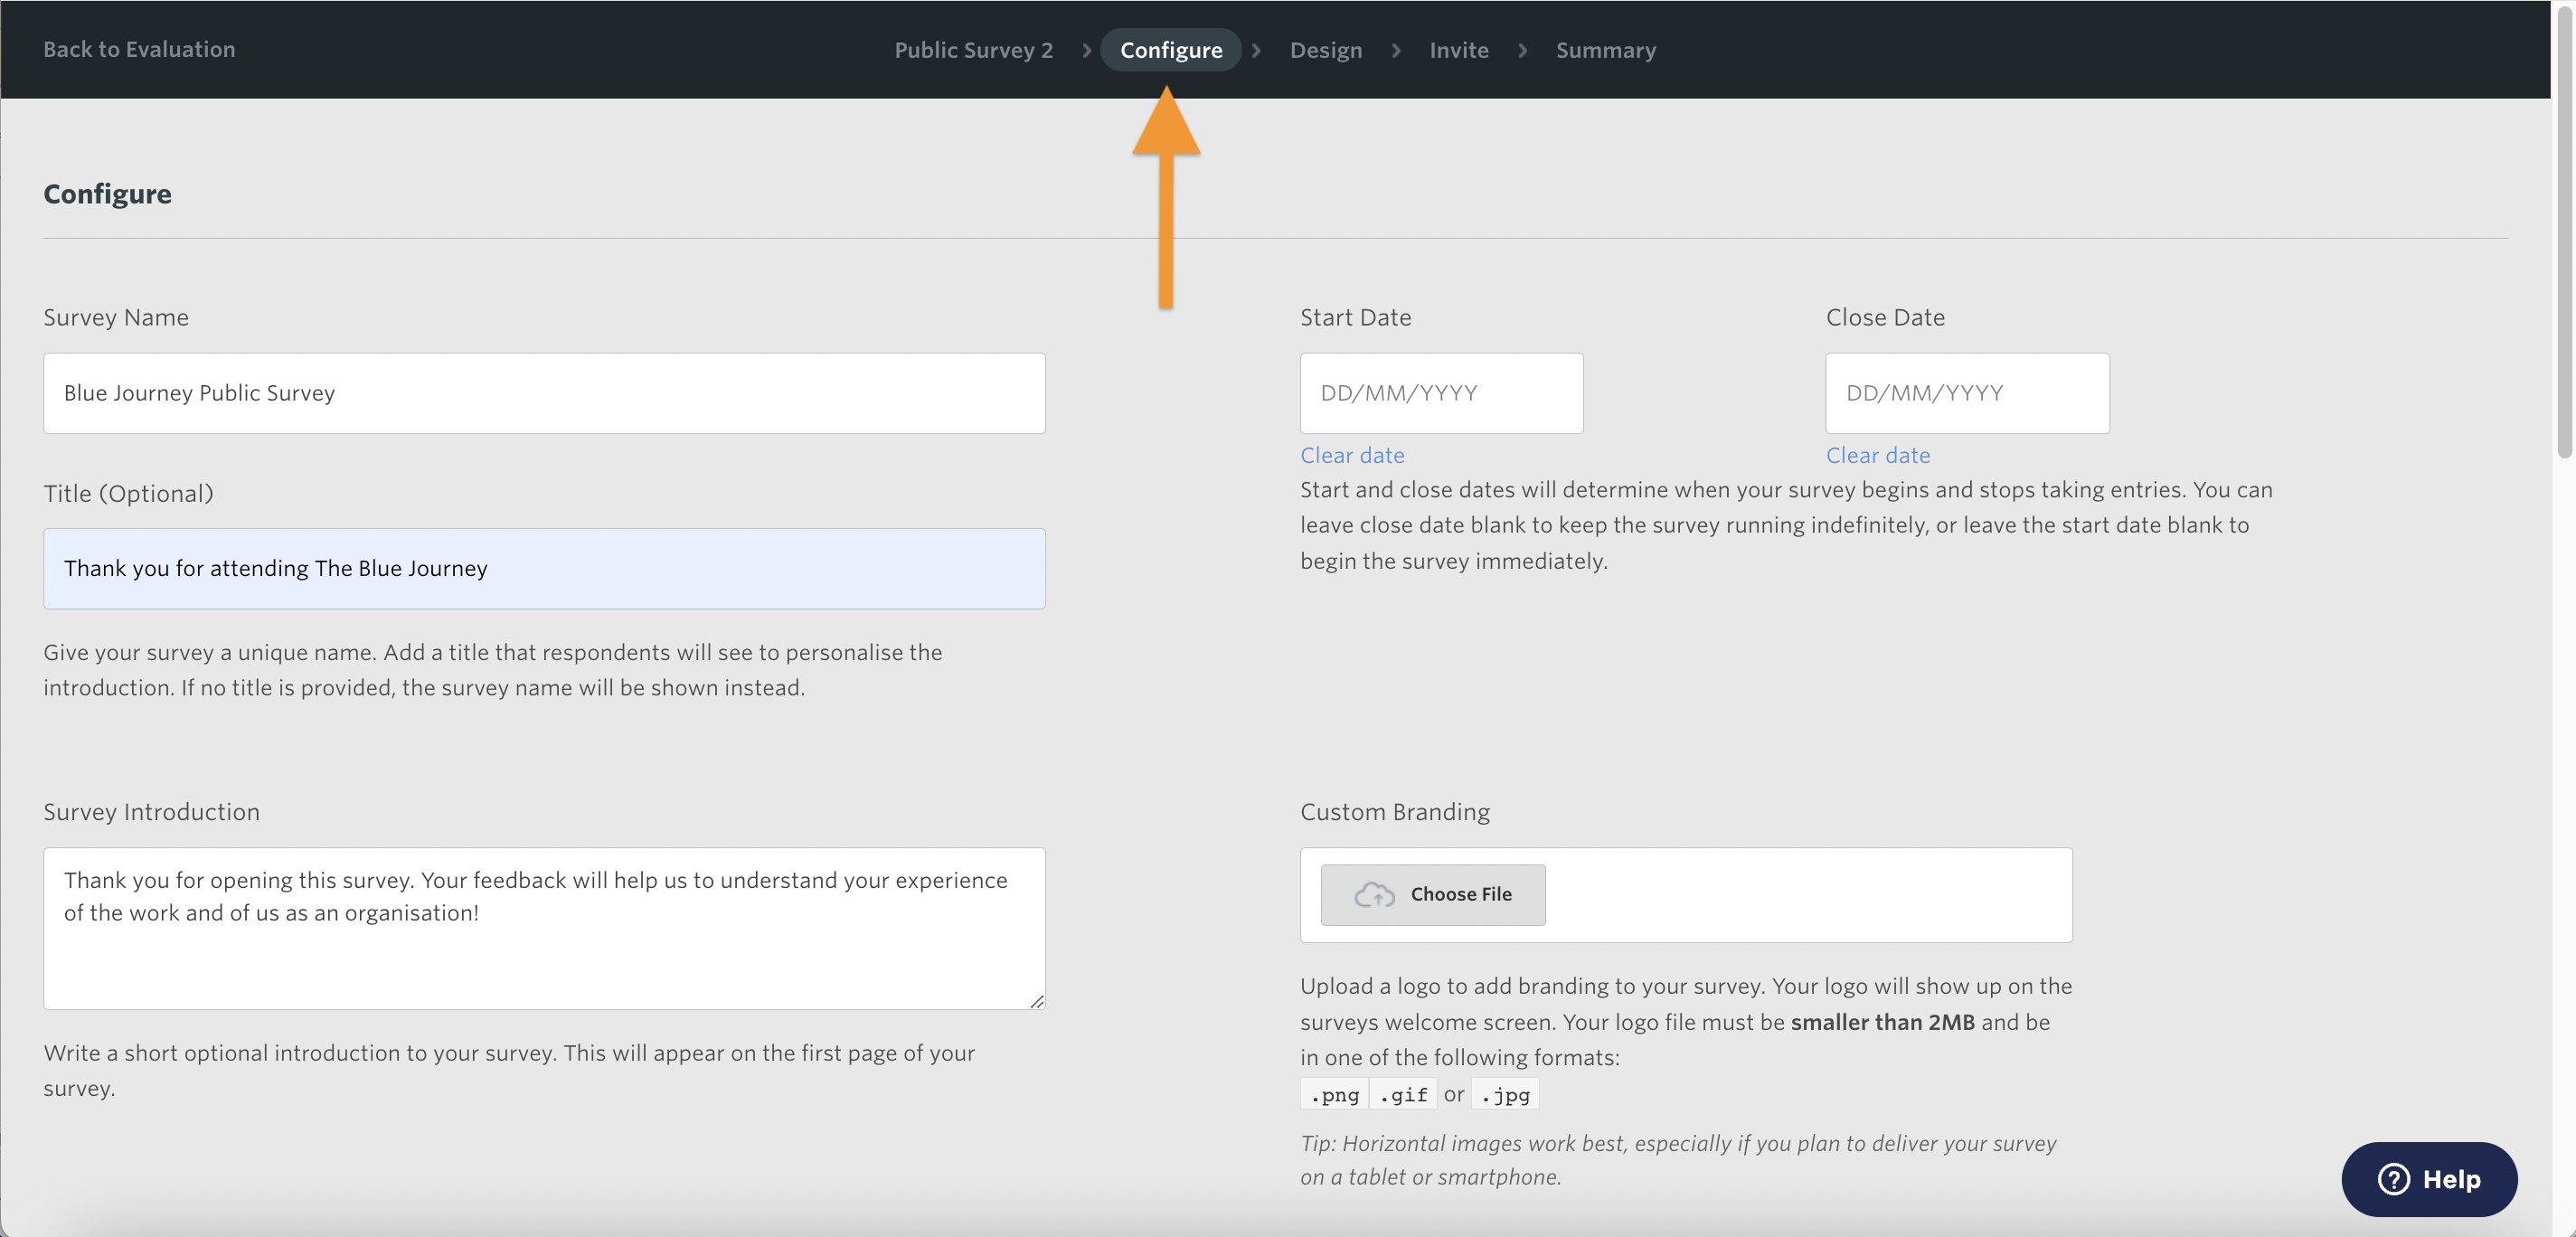
On the ‘Configure’ page you can set up the following options for your survey:
This is the name you would like to give the survey for your own use.
This is the title your respondents will read when they receive the survey. If you do not use a title then the respondent will see the survey name instead.
- Start and close dates (optional)
The start and close dates determine when the survey is live.
- Survey introduction (optional)
Write a short introduction that will appear on the front page of your survey. Use the introduction to explain why you are collecting the data and what it will be used for. Please note, survey introduction will not appear if you choose to use the ‘Interview’ delivery method.
- Custom branding (optional)
Upload your own logo which will appear on the front page of the survey.
If you created your evaluation from the ‘Template’, the survey will automatically be set to the correct survey type. If you created from ‘Evaluation’ or ‘Blank’ you will need to select the right option for your survey, depending on who you are planning to send it to.
There are three survey types:
- Prior survey– a survey taken before the work has started, to measure expectations. Prior surveys are generally completed by self assessors.
- Standard survey– a survey for capturing one-off reactions. Standard surveys are generally completed by the public.
- Post survey– a survey taken after the event to record responses which can be compared with the prior survey. Post surveys are generally completed by peer and self assessors.
Note: Leave the ‘Survey link’ section blank.
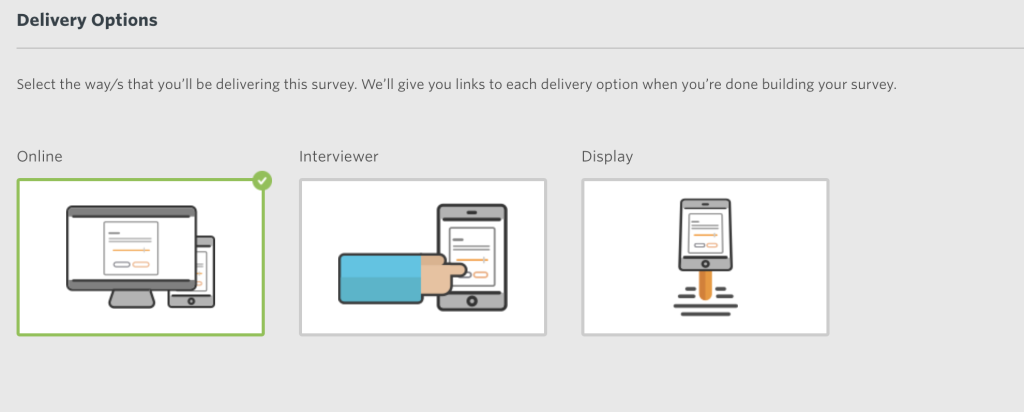
If you are creating a survey for public respondents, this is where you specify how you plan to deliver the survey. You can select multiple types for the same survey. Once selected, a unique survey link will be created for each type and displayed on the ‘Summary’ page. If the survey you are working on is for peer or self assessors, do not select a delivery type.
There are three delivery types:
- Online survey: creates a link that can be emailed out to the public or shared via social media. By default, this delivery option only accepts one response per device. You can override this setting in the ‘Advanced’ section of the Configure page.
- Interviewer: creates a link that you can use on a portable device to collect survey responses in person. This delivery option accepts multiple responses per device.
- Display: creates a link that can be used on a stand-alone device (for example, a screen in a foyer). This delivery option accepts multiple responses per device.
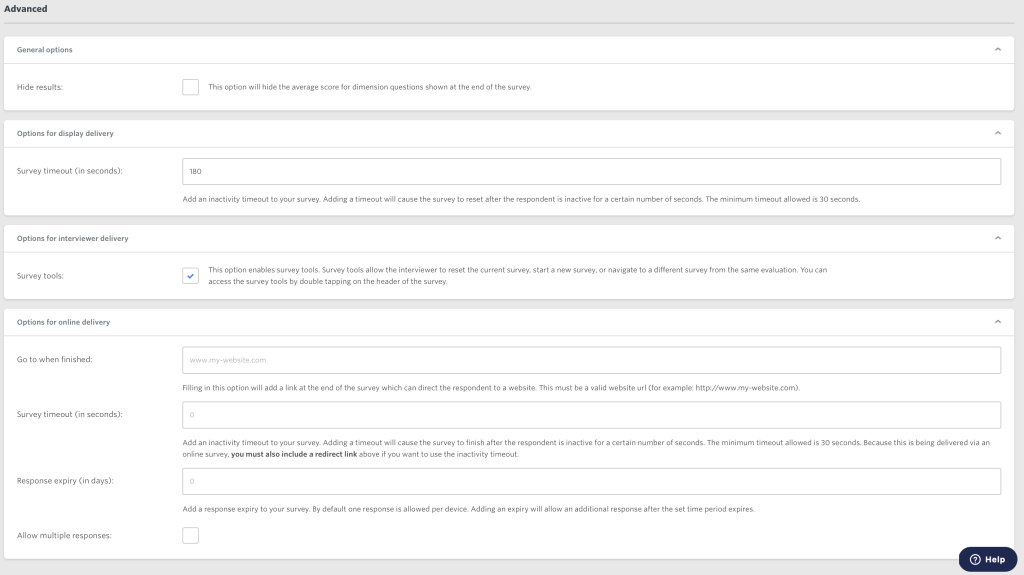
Note: Online and Display delivery requires a stable internet connection to collect survey responses. Interviewer can be used offline – please refer to our Offline Surveys guidance for more information.
5.2 Add survey content
To add content to your survey, click on the ‘Design’ tab in the navigation panel.
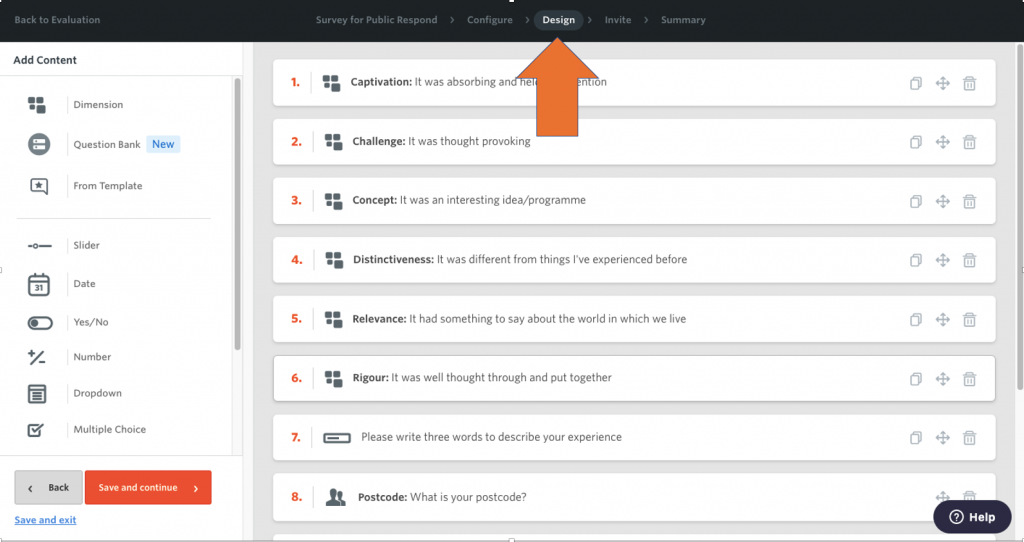
If you created your evaluation from the ‘Template’ or ‘Evaluation’ options, the survey will automatically include survey questions from either the template or the evaluation you copied from. If you created from ‘Blank’ your survey will be empty and you’ll need to add content.
Use the ‘Add content’ panel to add the following content types:
A dimension is a fixed statement that respondents can agree or disagree with, rated using a slider. The slider represents a one-point scale on a continuum, where one end is 0, the middle is 0.5 and the other end is 1. This means that every position on the slider has its own value.
Culture Counts’ dimensions have been co-created with the arts and cultural sector.
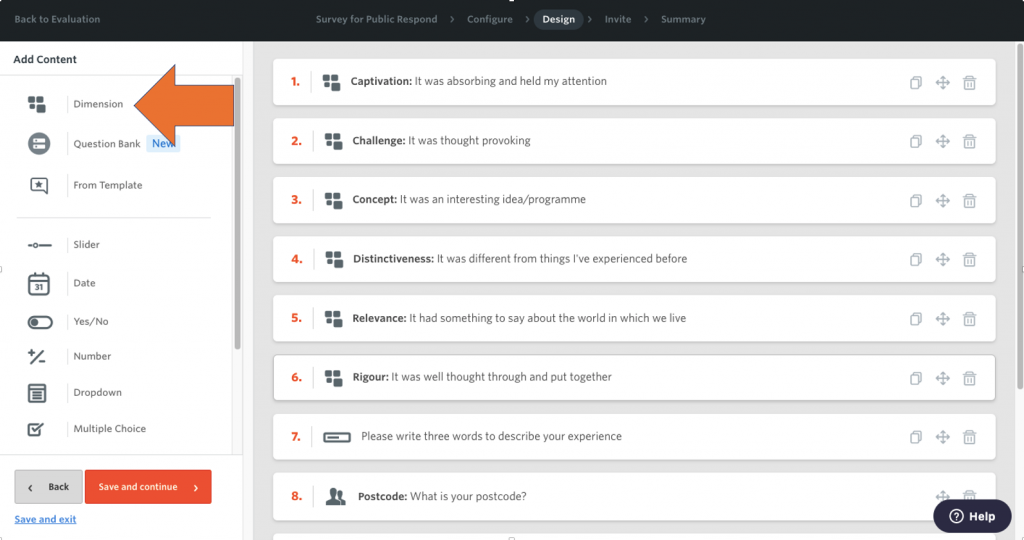
A library of commonly asked, predefined questions which you can browse through and easily add to your surveys. Read our Question Bank guidance for support on how to use these questions.
The ‘From Template’ button appears if you chose to create from ‘Template’. It provides a list of all the questions included in your selected template, so if you delete one you can easily add it back in again if you change your mind.
A simple slider input, where responses are recorded along a slider that ranges between three values, which default to ‘Strongly disagree’, ‘Neutral’, and ‘Strongly agree’.
Provides a date input where respondents can select a date from a calendar.
Gives the respondent two options to choose from, which default to ‘No’ and ‘Yes’.
A basic number input, where numbers can be input by either typing, or changed using up and down arrows; minimum and maximum values can be specified.
Provides a dropdown list, where respondents can answer by choosing one of the options.
Provides a selection of answers, where respondents can answer by selecting one or more of the options.
A short text input is designed for smaller text responses, such as one-word answers. For this question format, the Culture Counts platform will automatically graph the most commonly used words.
A simple text input that allows respondents to type an answer or comment with no word limit. These responses are available via the CSV file download and Insights Reports.
This displays a message within the survey but does not require respondents to provide an answer. It is typically used to provide respondents with additional instructions or context.
This content option provides a section to ask for respondents’ email contact information. It is a simple text input designed to recognise if the text entered is an email address. It also ensures anonymity for the survey respondent by making the email addresses download separately, ensuring that respondent emails can’t be matched with their answers. Please refer to the download email responses section for more information.
5.3 Edit or remove content
To edit content, click on the question text you wish to edit and type your desired text. To remove a question, click the ‘rubbish bin’ icon next to a question. To change the order of questions, press the ‘Drag to reorder’ button and drag and drop the question to the desired location.
5.4 Survey logic
Survey logic allows you to hide or show questions based on a respondent’s answers to earlier questions or what type of survey the respondent is completing. Using logic to ask targeted questions helps keep surveys short and achieve increased response rates.
- Click on a survey question you’d like to add logic to on the ‘Design’ page.
- Click on the grey ‘Logic’ button.
- Click the ‘Add logic to this question’ button.
- Choose whether to ‘Hide’ or ‘Show’ the question for particular delivery methods, respondent categories or a response to another question.
- Choose the ‘Condition’ and ‘Value’ that has to be used or chosen in order for the logic to be applied and the question to be hidden or shown (depending on your desired results).
- Click the blue ‘Save a close’ button to apply the survey logic.
Once you have applied survey logic to your question, you will see the Survey Logic symbol appear in your ‘Design’ page next to the appropriate question.
You should always preview your survey and test the logic to make sure that it has been applied correctly. To preview a survey, navigate to the ‘Summary’ tab and click on the ‘eye’ icon next to your selected delivery type link.
5.5 Making a question ‘required’
It is possible to design your survey so that a specific question requires a response before the respondent can proceed with the survey.
In order to do this, you should:
- On the Design page, click on the question you need to make ‘required’
- Scroll to the bottom of the ‘Question Content’ box where there is the ‘Required question’ toggle
- Click on the toggle to make the question ‘required’
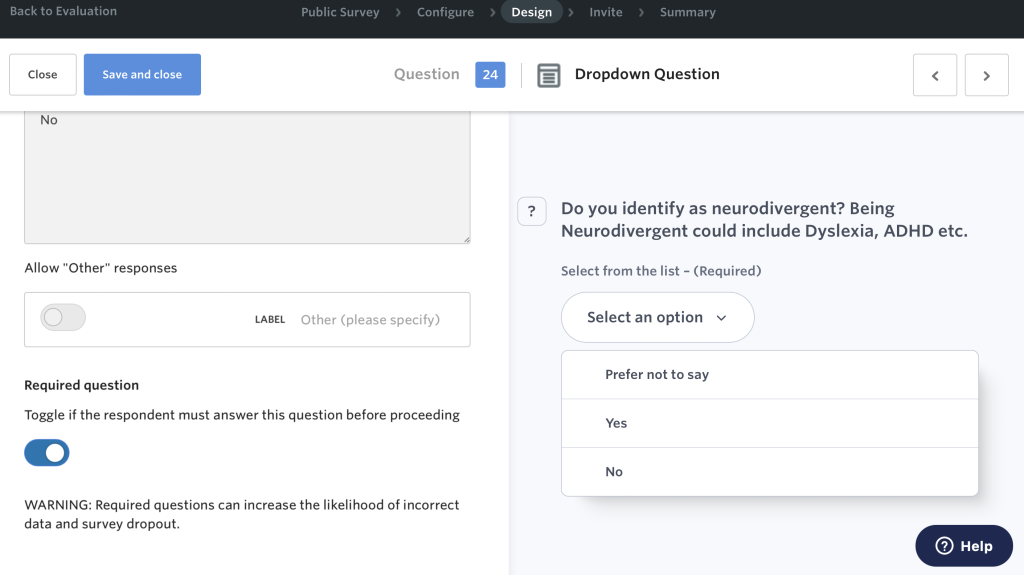
Please know that we have further advice on making questions required. To view this, please access the blogpost ‘Making a Question Required’.
6. Move surveys
Moving a survey will move all its associated data from one evaluation to another. Think of an evaluation like a folder that you store surveys in. By moving a survey, you are taking it out of one folder and putting it in another.
- Click on the evaluation that contains the survey you’d like to move.
- Click the ‘Edit’ button on the survey you’d like to move and select ‘Move’ from the dropdown menu.
- Select the evaluation you’d like to move the survey to from the dropdown menu and click the ‘Move survey’ button.
7. Archive evaluations and surveys
Archiving an evaluation or survey will remove it from your dashboard. Evaluations and surveys that are archived are not permanently deleted and can be recovered if required. To recover an archived evaluation or survey contact our support team.
7.1 Archive an evaluation
- Click on the evaluation you want to archive.
- Click the evaluation’s ‘Edit’ button and select ‘Archive’ from the dropdown menu.
- Click ‘Yes, archive this evaluation’.
This will archive the evaluation, including all surveys within it. If you are a Creator or Admin of an evaluation, you also have the option to archive the evaluation for everyone it is shared with. This is useful when a project is no longer relevant, an evaluation was created in error, or you simply want to remove it from their dashboards.
7.2 Archive a survey
- Click on the evaluation that contains the survey you’d like to archive.
- Click the ‘edit’ button on the survey you’d like to archive and select ‘archive’ from the dropdown menu.
- Click ‘Yes, archive this survey’.
8. Download CSV files
8.1 Download evaluation and survey responses
The Culture Counts platform exports survey data as comma-separated values files or ‘CSVs’. CSVs are a common way to store data and are the default format for exporting survey data across many platforms. CSVs can be opened and edited in most spreadsheet software, including Microsoft Excel and Numbers, enabling you to conduct further analysis.
To download a CSV file of your data, open an evaluation and click the ‘Download evaluation results’ button. Alternatively, you can download the data for specific surveys by opening a survey and clicking on the ‘Download survey results’ button on the ‘Summary’ page.
8.2 Download email responses
To comply with best-practice privacy guidelines, Culture Counts only allows users to export email information separate to the rest of the dataset. Follow the steps below to download all emails collected in a survey, in a separate CSV file.
- Choose the evaluation you want to download email addresses from.
- Select the survey you want to download email addresses from.
- On the ‘Summary’ page, click the ‘Manage’ button and select ‘Download emails’ from the dropdown menu.
9. Browser support
9.1 Recommended browsers
For the optimum experience and better security using Culture Counts, we recommend updating your browser to the latest version.
The survey application also officially supports these mobile browsers:
- Android 7 or greater
- i0S 14 or greater
- The latest 2 versions of Firefox for mobile
- The latest 2 versions of Chrome on Mobile
- Internet Explorer Mobile on Windows Phone 8
Please note that the Culture Counts dashboard does not currently support mobile browsers.
9.2 Outgoing browser support
Culture Counts have updated their browser support. This is because several older browsers are no longer being supported by their official vendors or other technologies that are used at Culture Counts. As a result, Culture Counts may not work as expected on the following browsers:
- Internet Explorer 11
- Microsoft Edge 18
- Google Chrome 79 or below
- Safari 12.1 or below
9.3 What if I can’t update my browser?
Culture Counts want to hear from users who are operating any of the browser versions mentioned above who are unable to update their browser. They’re interested to understand why these browsers are being used and whether there are any barriers to upgrading. Let them know by emailing [email protected].
If you’re still having issues using the Culture Counts platform, please do not hesitate to get in touch with us for support.